


 Adobe PDF
 Microsoft Word
By State
- Alabama
- Alaska
- Arizona
- Arkansas
- California
- Colorado
- Connecticut
- Delaware
- Florida
- Georgia
- Hawaii
- Idaho
- Illinois
- Indiana
- Iowa
- Kansas
- Kentucky
- Louisiana
- Maine
- Maryland
- Massachusetts
- Michigan
- Minnesota
- Mississippi
- Missouri
- Montana
- Nebraska
- Nevada
- New Hampshire
- New Jersey
- New Mexico
- New York
- North Carolina
- North Dakota
- Ohio
- Oklahoma
- Oregon
- Pennsylvania
- Rhode Island
- South Carolina
- South Dakota
- Tennessee
- Texas
- Utah
- Vermont
- Virginia
- Washington
- West Virginia
- Wisconsin
- Wyoming
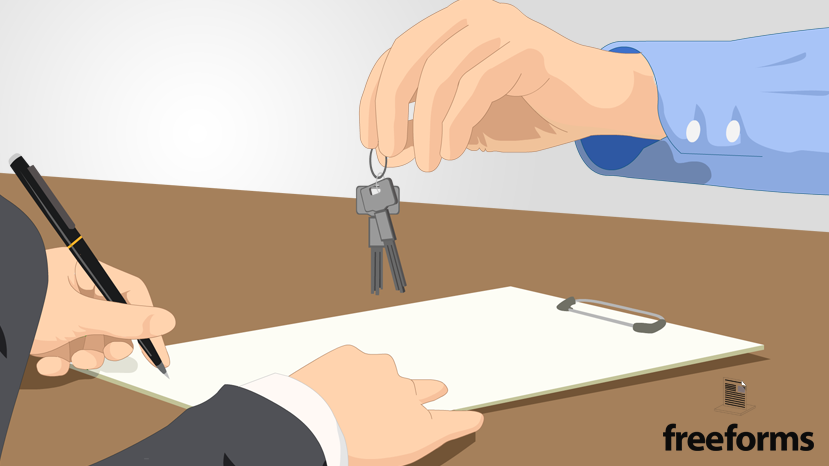
What is a Real Estate Purchase Agreement?
A real estate purchase agreement is an instrument that is employed when individuals partake in the purchase & sale of a residential dwelling. This can be applicable to a single-family house, condo (or another type of common-interest community property), duplex, etc. Once a buyer shows interest in a residence for sale, they will submit an offer in the form of this agreement. Listed within the content of the agreement is the prospective buyer’s desired contractual terms, such as their proposed purchase price, provisional requests, protective contingencies, and the amount of earnest money they are willing to deposit. The seller will typically be given a time limit to either accept, deny or counteroffer the submission. If accepted, the seller shall sign the offer creating a binding purchase agreement that will start the process of transferring the property. Otherwise, they may counter with an alternative proposition that includes the terms that they are more comfortable with (also using this very agreement).
Can a Seller Back Out of a Purchase Agreement?
Once a purchase agreement for the sale of residential property has been signed and is in escrow, participants are legally bound to uphold the commitments registered within the form. If the seller has a change of heart and would like to back out of the agreement, they may have some options to do so:
- While the Contract is Under Review – A lot of times after an agreement has been signed, it will be held under a five (5) day reviewing period where attornies can comb through the contract for verification purposes. The seller has the right to terminate the agreement at any time within the duration of this process.
- Back Out Addendum – If the seller included an addendum within the purchase agreement that allows them to back out at any time during the course of the contract, they may do so without any repercussions of the law. Most buyers will not agree to include this addendum within the content of the purchase agreement.
- Breach of Contract – When formulating the sales document, both parties will typically record certain contingencies that allow them to terminate the contract if they are not met prior to closing.
- Put in a Request to the Buyer – If all else fails, contact the purchasing party explaining the reasons why you would like to terminate the agreement. You never know, a buyer could have compassion for your situation and agree to void the contract. It never hurts to ask.
If the seller is unable to lawfully withdraw from the contract and still refuses to continue with the sale, they can face legal consequences and be held liable to compensate the buyer for an array of damages.
What are the Common Contingencies in a Purchase Agreement?
A contingency is essentially a clause within the contract that stipulates that if a certain requirement is not met, then the contract is void or open to further negotiations. These contingencies can be directly inserted within the content of the purchase agreement or attached to the contract in the form of an addendum. When creating your purchase agreement/offer, it is important to include any contingencies that will provide security for the transaction. Listed below are some of the more customary contingencies that buyers/sellers will want to include within the purchase agreement:
- Appraisal – Required by most banks, this clause states that an appraisal must be conducted before the transfer of property can occur. If the estimated value of the home is lower than the agreed-upon sales price, then the buyer must either terminate the contract, renegotiate the purchase price, or switch lenders in order to receive a second opinion.
- Financing – The contract may be terminated if the purchaser is unable to secure financing from a lender.
- Home Sale – The sale is contingent upon the buyer being able to sell their home by a specific date in order to continue with the purchasing of the seller’s property. (Sellers may be reluctant to accept this contingency and are usually more prone to accept offers that do not include this.)
- Homeowners Insurance – Insurance companies will sometimes refuse to provide coverage to high-risk properties that are located within certain regions of the country (flood zones, wildfire zones, earthquake fault zones, etc.). This contingency allows purchasers to back out of the agreement if they are unable to insure the property.
- Inspection – This type of contingency mandates that after entering into an agreement for the sale of a home, the buyer will have a certain period of time to have a professional perform a property inspection. If the inspection report indicates that there is a significant material defect contained within the property, the buyer has the right to cancel the agreement or propose a new deal with the seller.
- Kick-Out Clause – A compromise for the above-mentioned home sale contingency, this grants the seller the authority to proceed with the marketing of their property while under contract with the buyer. If the seller finds another buyer who does not require that they sell their home first in order to purchase the seller’s, they can then end the current sales contract and move forward with the new buyer who doesn’t implement the home sale contingency.
- Title – This requests that the seller provide confirmation that the property’s title is free and clear of any liens or encumbrances before finalizing the transaction. It also stipulates that the buyer has the right to review all documentation concerning the property’s title before the closing date. If an issue with the title arises, they will have the option of terminating the purchase agreement.
What is an Addendum?
An addendum is an additional form that can be attached to the purchase agreement. It can provide supplementary terms to the contract that either alter the course of the previously arranged agreement or simply just add to it at the time of its inception. As mentioned in the previous section, a contingency can come in the form of an addendum. Here are several different types of addendums that can be implemented, some of which incorporate the common contingencies listed above:
- Purchase Agreement Addendums
- Closing Date Extension Addendum
- Condominium Association Addendum
- Earnest Money Receipt
- Earnest Money Release
- Escrow Holdback Agreement Addendum
- Estoppel Certificate Addendum
- Inspection Contingency Addendum
- Owner (Seller) Financing Addendum
- Short Sale Addendum
- Termination Letter to Purchase Agreement
- Third (3rd) Party Financing Addendum
What is a Realtor?
A lot of people use the terms “Realtor” and “real estate agent” interchangeably and do not realize that they are not technically the same. Read the descriptions below to better understand the key differences between the two.
Real Estate Agent vs. Realtor
A real estate agent is an individual who has completed the required salesperson course for their state (this course will vary in the number of hours needed to pass depending on the state). After passing the course, they are instructed to take the mandatory state exam in order to demonstrate that they have sufficient knowledge of the local real estate laws and protocol. They must then join an agency that is overseen by a broker in order to legally serve clients who seek assistance with their selling or purchasing needs.
A Realtor is someone who has fulfilled all the requirements needed to become a licensed real estate agent and is also affiliated with the National Association of REALTORS®. Becoming a member of this organization means that you are held to a higher standard than your average salesperson, as you have to follow a certain code of ethics that is enforced by the association. In short, it is an extra credential that further legitimizes the agent and grants them access to the group’s various resources that can help facilitate a sale.
How to Find a Listing Agent
As most homeowners looking to sell their property are busy with their careers, families, and other obligations, they do not have the time nor the experience/knowledge to sell their own property by themselves. Luckily, there are agents who specialize in the sale of residential real estate who can help ease the process and maximize your final proceeds. A listing agent can perform the following tasks:
- Pricing the Home
- Advertising the Property
- Coordinate Showings
- Negotiating & Accepting Offers
- Managing the Essential Paperwork
- Preparing the Necessary Disclosures
But you can’t just hire anybody who has a license, you are going to want to recruit an agent who is qualified and has valuable knowledge of the area your property is located in. This means that you should avoid hiring someone who just recently acquired their license because they are a friend or family member. Begin the process by:
Researching Local Agents – Find out who the available agents are in your area by:
- Asking your friends, family, and co-workers if they know of any agents that they could recommend for hire.
- Driving around the neighborhood and taking note of any agents who are prominently displayed on the various “for sale” signs along the road.
- Attending open houses of similar properties to network with the agents showing the homes.
- Going online and visiting the websites of local real estate agencies (each website should include a directory of all the available listing agents in the area). Some agencies that can be found throughout the country include:
Reviewing Their Record – When deciding whether or not you are going to sign with an agent, make sure that you first check their credentials. Try to verify the following info:
- How long have they been actively selling real estate?
- Are they doing it full-time or part-time?
- How many homes have they sold in the past year?
- Are they receiving top market prices?
- Do they sell within an efficient time frame?
- Are they proficient in selling homes within your neighborhood?
- Do they belong to a respected agency?
It is suggested that you interview a minimum of three (3) agents prior to entering into a listing agreement. Be cautious of hiring an agent who gives you a significantly higher estimate for the value of your home than other agents you’ve interviewed, they may just be trying to entice you to list with them.
Real Estate Agent vs. FSBO
“For Sale by Owner“, or FSBO, is the act of selling a residential property without the assistance of a realtor/real estate agent. Although the majority of home sellers enlist the help of a real estate agent, that does not mean selling a home on your own is an inconceivable task. It does, however, require a lot more time, research, and work for the seller (marketing your home can be a full-time job). When considering the idea of selling your property on your own versus with an agent, you should first assess the pros & cons associated with both approaches:
Benefits of selling your own property:
- Not having to pay a listing agent’s commission (which can usually range from 4-7% of the sales price depending on the agent’s reputation and location of the sale).
- Determining your own asking price.
- Having full control of all advertising, showings, and negotiations.
- Buyers may underestimate your ability to sell the home accordingly, thus giving you the upper hand when being approached.
Disadvantages of selling your own property:
- Lack of expertise in the local market.
- Amount of time that will be taken away from your personal and professional life.
- Liability to follow the state’s real estate laws and provide the required disclosures.
- Handling all the necessary paperwork and approving the buyer.
- If the buyer has an agent, you will still have to pay their portion of the commission (typically 3% of the sales price).
- On average, FSBO properties tend to get less money than properties listed with real estate agents.
How to Sell Real Estate on Your Own
For the majority of the United States population, their home is their biggest asset. When a homeowner decides that they would like to sell their property, it can seem like a very intimidating task. Owners want to make sure they get top dollar for their property and hopefully even make a profit. So, it is important that before you put your dwelling on the market, you really reflect on whether or not you are truly ready to sell.
Whether you’re looking to sell your property because you would like to upgrade, downgrade, or relocate, this guide can help you take the necessary steps to sell your home without the assistance of a listing agent.
Step 1 – Prepping Your Home for the Marketplace

When preparing to sell your home, it is important to ensure that the property is presentable for public viewing. Here are some various ways you can make your property look more appealing to prospective buyers:
Administer a Deep-Cleaning – The first step should involve you making sure that the interior of the home is immaculate. This can be achieved by:
- Removing any unwanted clutter.
- Wiping down all the surfaces.
- Washing the windows.
- Vacuuming and mopping the floors.
- Shampooing carpets that have unsightly stains.
List the Various Damages/Deficiencies – Walk through the home and write down any noticeable flaws contained within the dwelling. Next, decide whether or not they are worth fixing for the purpose of improving the home’s appearance and potentially receiving more money from the sale. You don’t want to deter buyers from purchasing your home because of minor defects that could have easily been repaired. This could include:
- Repairing any defective components within the home, such as a broken window, malfunctioning appliance, faulty garage door, etc.
- Making cosmetic enhancements, such as adding a fresh coat of paint to areas in need, replacing the carpet, updating light fixtures, etc.
Staging the Property – This is another common technique used in the real estate world that involves a professional coming in and enhancing the visual aesthetic of the home by outfitting the property with:
- Attractive Furniture
- Decorative Pieces
- Complementing Accessories
Enhancing the Curb Appeal – Once the inside is taken care of, you should improve the property’s external appearance by:
- Clearing out any unnecessary items in the yard.
- Having the property freshly landscaped (mow the lawn, weed wack, add fresh mulch to the beds, rack leaves, trim, etc.).
- Touching up any cosmetic defects found on the structure (chipped paint, dents on the siding, missing shingles, etc.).
- Removing debris out of the gutters.
- Paving the driveway.
- Cleaning the pool and/or hot tub (if applicable).
Now that your home is fully prepped for sale, you may want to consider having a professional conduct a:
- Pre-inspection – Although it is generally thought that the buyer is responsible for having an inspection performed, it is also considered a good measure for the seller to carry out their own before putting their home on the market. This way, the seller is aware of any major defects prior to entering into an agreement with a prospective buyer and can avoid the hassle of a stalled closing. This also demonstrates a sign of good faith to the buyer. (The ASHI offers a search program that allows individuals to look up certified home inspectors that are available for hire in their area.)
Step 2 – Determining the Market Value of Your Home
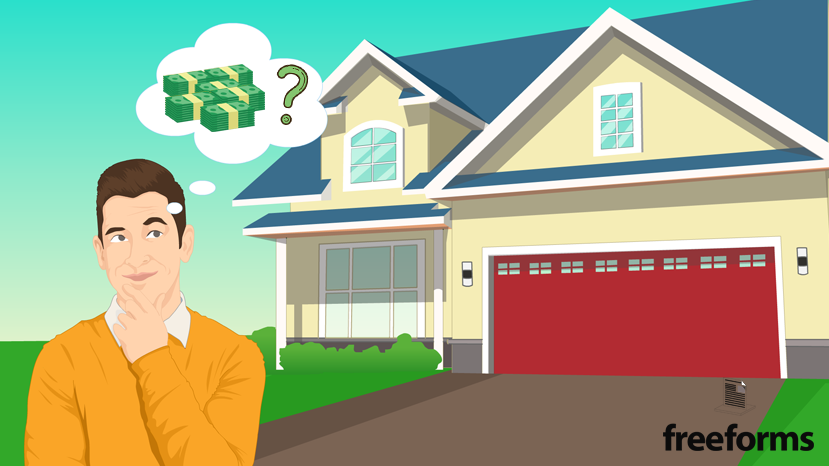
The most important element when getting ready to put your property on the market is settling on an asking price. This measure requires research and a lot of consideration in order to sell your home in a timely manner. Some of the factors that contribute to a property’s value include:
- Age
- Condition
- Current Economy
- Improvements
- Interest Rates
- Location, Location, Location
- Lot Size
- Number of Bedrooms/Bathrooms
- Square Footage of the Home
- Supply & Demand
- Time of Year
Listed below are some of the methods used to price residential properties:
- Online Pricing Tools – Numerous websites that are geared towards the sale of real estate offer pricing tools that can help calculate a rough estimate of what your home is worth, Zillow.com being among one of the more popular. (This should only be used for a basic idea of what the real estate’s value is.)
- Comparative Market Analysis (CMA) – Frequently implemented by agents in the real estate business, this method calculates the value by comparing the residence for sale to other similar properties that have been recently purchased. Typically, the individual performing this task will get the data of at least 3 other comparable homes in the area and adjust the price by adding & subtracting the different features of the properties. After running the calculations, you should be able to determine the ballpark figure of what the home is worth. (Although you should only use properties that have sold for your CMA calculations, it doesn’t hurt to also study similar properties that are currently on the market.)
- Hire an Appraiser – Any buyer that has to obtain financing from a lender will most likely have to have an appraisal conducted on the property per request of the mortgage company. Having said that, it is also an option for the seller to have this implemented beforehand in order to get a better feel for what the home is worth. (The average cost of an appraisal can range from $300-$400 for a single-family dwelling.)
Think about the following questions when pricing your home:
- Am I in a Rush to Sell? – The owner must decide what is more important, selling the property quickly or holding out for a higher number. If the owner is in a rush to get rid of the home, they should ask for an amount no higher than the estimated value that they calculated when pricing the property. Listing your home right can even drive up the price, as you will probably receive multiple offers and be able to use that as leverage when haggling with interested parties. If there is no hurry to sell, the owner can start high and then periodically reduce the price until a sale is achieved. But keep in mind, the longer the home is on the market, the more suspicious buyers become of the property.
- Should I Add a Percentage for Closing Costs to the Sales Price? – Traditionally, the seller is responsible for paying the bulk of the closing costs connected to the sale of the property. But if the market is in their favor, they can try to incorporate the anticipated cost of closing into the listing price. Luckily for FSBO sellers, closing costs are already significantly reduced since they will not be paying a listing agent’s commission.
Step 3 – Marketing Your Property for Sale

In order to alert potential buyers of your available property, you must publicize it through the various avenues that are accessible today. To do so, you are going to want to execute the following checklist:
Take Photos – Once the property is in pristine order, you are going to want to capture quality pictures of the residence inside & out that highlight its best features. It is recommended that you hire a professional photographer who has all the necessary equipment and knowledge it takes to snap top-grade photos. A good real estate photographer can even create a virtual tour that allows online visitors a 360-degree view of the property’s interior layout. If you are looking to save money, you can make the decision to take the pictures yourself as long as you have a high-definition camera and the confidence in your abilities. But remember, this is the most significant element when promoting your property, as most people base their opinions on the property’s appearance in the photos.
Write a Description – It is important that you write a detailed summary that describes the home for sale and all its selling points. Take your time when crafting the description, as it will need to be included in every ad that you post. Be sure to include an enticing headline and your personal contact information so that interested parties can reach you. Details about the home that you may want to consider covering in your description include:
- Additional Rooms (gym, office, den, etc.)
- Age
- Amenities (pool, hot tub, fireplace, etc.)
- Appliances
- Attic/Basement
- Cabinets
- Condition
- Counters
- Flooring
- Garage (number of bays, if applicable)
- Heating/Cooling System
- Landscaping
- Location
- Lot Size
- Layout
- Nearby Access to Transportation
- Number of Bathrooms
- Number of Bedrooms
- Parking
- Renovations/Upgrades
- Roof
- Septic System
- Special Promotions (home warranty, owner financing, flexible closing date, etc.)
- Square Footage
- Storage
- Style of House (ranch, colonial, cottage, etc., if applicable)
- Type of Home (house, condo, duplex, etc.)
- View
- Windows
Display a “For Sale” Sign – Don’t underestimate the effectiveness of displaying a “For Sale by Owner” sign on the property, especially if the home is located in a high-traffic area. This is essentially free promotion as anybody passing by will be made aware that the property is on the market. Make sure that the sign is positioned in a way that is most visible to people commuting to their destination. Write your telephone number within the indicated area of the sign, making sure that the print is legible and easily seen from a distance. Not only will this inform passersby, but it can also help interested parties locate your property for showings. If you live in a common-interest community, you may want to refer to the association’s rules as to whether or not you are allowed to post a sign on the premises. (FSBO signs can be found at most home improvement stores and can vary in cost. You can also order online through websites such as Lowes.com.)
Post Online Ads – Now that you have taken care of the preliminary measures, it’s time to place your ads. In the earlier days of selling property, homeowners would have to advertise their residence in a local newspaper or magazine. Thanks to the internet, it is much easier for sellers to market their own home without the assistance of a real estate agent. There are various websites fully dedicated to promoting homes for sale, the top sites being:
- Zillow.com
- Trulia.com (partners with Zillow)
- HomeFinder.com
The following sites listed below completely focus on the buying and selling of FSBO properties:
In order to post ads, you are first going to need to create an account for each website. Once you have signed up, upload the photos of your property and insert the written description that you produced earlier within the corresponding text boxes. You may then publish the ad once you feel it is ready to be presented to the public. Congratulations! Your property is now displayed on a prominent home sales website. Now it’s time to sit back and await responses. (It also doesn’t hurt to inform friends, acquaintances, and family members of your available property by posting on your various social media accounts, e.g. Facebook.com.)
Unfortunately, FSBO sellers are unable to directly advertise on MLS.com and Realtor.com, which are popular websites reserved for properties that are listed with licensed real estate agents. But, if interested, there are several third-party companies available online that can list your property for you on the aforementioned websites for a fee.
Step 4 – Showing the Property

Now that you have publicized your property for sale, you will begin to receive inquiries. It is imperative that you keep track of your email and answer/return all incoming phone calls. People will be contacting you asking various questions concerning the home and eventually request to view the property. Showing your home can be a bit of a hassle, especially when you have other family members in and out of the dwelling. But, it is important to realize that the more people who view the home, the more chance of you receiving an offer. Follow the guidelines listed below to enhance the quality of your showings:
Prepare Your Home for Viewing – As you already took the necessary steps to improve your home’s appearance when prepping it for the marketplace, all you will have to do now is maintain its presentability for showings. This means you must:
- Make sure that the home is clean, smells good, and is set to an appropriate temperature.
- Turn on all the proper lighting so that each room is easily visible.
- If you own a pet, secure it in a cage or fenced-in area during the duration of the showing. This way, your pet won’t get loose or disturb any visitors viewing the property.
- Put away any valuable items in a safe place as a precautionary measure.
Private Showings – This occurs when a private party requests to view the property by appointment. The appointment can be made in advance or sprung upon you at the last second. This is why it is important that the seller:
- Give other members of the dwelling sufficient notice of any known showings so that they can tidy up the home and vacate the premises before the viewing party arrives.
- Coordinate a certain protocol with the other occupants of the household on what to do in the event of a last-minute showing.
Open House Showings – An open house is when a property is available for anyone to walk in and view the home within a specified time period. Some people question the effectiveness of this practice and don’t find it necessary to frequently conduct them. Others believe that they are productive and insist on carrying one out every other week. Ultimately, the choice is yours as to how often you would like to incorporate this tradition. If interested, sellers should strongly consider:
- Hosting an open house on the first weekend of the property being on the market.
- Opening their home to the public on Sunday during the afternoon.
- Purchasing and displaying an open house sign to indicate that the property is available for viewing.
- Going the extra mile and offering a spread of food & drinks to the visitors and even playing some light music for a more sociable ambiance.
Create a Comfortable Environment for your Guests – As interested parties approach to view your home, whether it be a private or open house showing, it is important that you make them feel welcome. You can start by:
- Greeting them at the door in a friendly manner and inviting them into the residence.
- Offering to answer any questions or concerns they may have during the course of examining the property.
- Giving the viewers enough space to explore the property for themselves. (We’ve all gone to a store where we would just like to freely browse the inventory but end up getting pestered by an overzealous salesperson. Don’t be that salesperson.)
- Be sure to thank everyone for coming as they leave the premises.
Step 5 – Receiving an Offer to Purchase the Real Estate
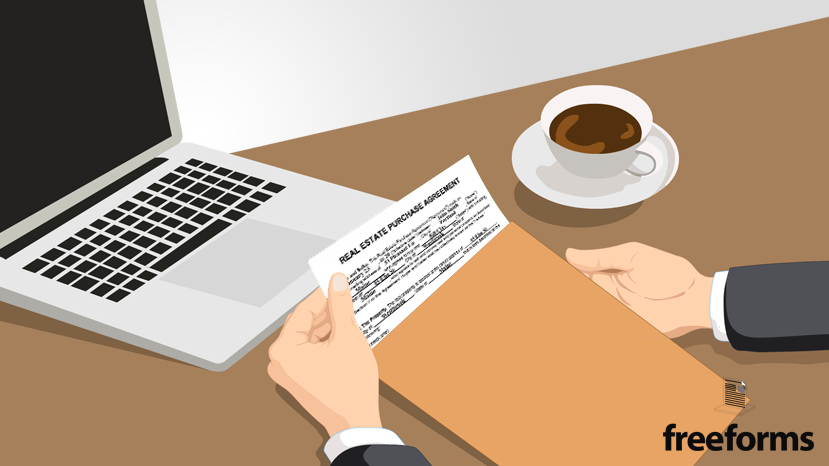
Hopefully, after showing your property to various parties, you will receive an offer from a prospective buyer looking to acquire the dwelling. This offer will come in the form of a purchase agreement that encompasses their desired terms. The seller should then review the listed terms and decide whether they agree to the conditions or not. If not, they may simply decline the offer altogether or submit a counteroffer expressing their demands. If they accept the terms provided, they can sign the offer converting it to a binding contract. Sellers should favor buyers who offer the following:
Letter of Pre-Approval – Is documentation distributed by a mortgage company validating the buyer’s ability to acquire financing. It can be a big waste of time and effort to enter into a sales contract with a buyer, only to find out later that they can’t even fund the purchase.
Earnest Money Deposit – This demonstrates that the party offering to purchase your home is serious and capable of buying the property. The amount usually ranges from 1-5% of the total sale price and later goes towards the purchaser’s down payment once the transaction is approved. The buyer will normally protect themselves with certain contingencies that ensure that the money is returned if the exchange doesn’t occur. But if the buyer decides to back out for any reason that is not safeguarded by a contingency, the seller may have the right to retain the funds held in escrow.
Cash Offer – When someone offers to purchase the home in cash without borrowing the money. This is considered more favorable to the seller because it takes less time to close on the property, as opposed to a transaction that involves a buyer who has to obtain financing from a loan company.
Some other considerations that the seller should think about when negotiating offers include:
Making Concessions – If the owner is really motivated to make a sale work, whether they aren’t receiving many offers, are in dire need of the money, or are looking to relocate by a certain date, they can offer the buyer certain incentives that will entice them to follow through with the exchange. Some concessions that might influence the buyer to carry out the deal include:
- Covering all the closing costs.
- Making repairs to the home.
- Upgrading certain appliances.
- Including any personal property that the purchaser may desire.
Owner Financing – This is when the seller acts as the lender and accepts payments from the purchasing party instead of them borrowing money from the bank. If both parties can come to an agreement on the terms of the loan, they must then execute a promissory note to be filed into the public record. Some of the benefits of owner/seller financing include:
- Certain tax breaks.
- Getting a return on your money from the loan’s interest rate percentage that is included with each payment provided by the buyer.
- Accelerates the closing process.
Step 6 – Meeting the Terms of the Purchase Agreement
After signing the offer, both parties will be required, by law, to follow through with the contractual obligations contained within the form. All federal & state regulations concerning the transfer of residential property must also be complied with in order to lawfully execute the sale. The rules can vary from state to state but sellers nationwide should always be prepared to supply the following:
Property Disclosure Form – Upon the acceptance of an offer, the seller is typically compelled, by law (depending on the state), to provide the buyer with a disclosure form giving an overview of the property’s current condition and indicate whether or not there are any adverse defects present within the home. Even if not required by the state’s law, this is commonly requested by prospective buyers in order to proceed with any type of transaction.
Lead-Based Paint Disclosure Form – No matter what state the sale is taking place in, the seller of a property built before 1978 is required to deliver this disclosure form to the buyer according to federal law.
Also, just because the home is now under contract, doesn’t mean that the sale is guaranteed to go through. In order to maintain the obligated terms of the contract, the buyer and seller must adhere to all the conditions made within the agreement. A few of the most common factors that can contribute to a delay in the closing process are:
Appraisal – Any findings that indicate that the property is worth less than the purchase price can halt the proceedings and require adjustments to be made to the agreement.
Financing – When a buyer is relying on a financial institution to provide the funds needed to purchase the home, it can sometimes go awry. If they have not been pre-approved, they may be notified during the course of the agreement that they do not meet the standards necessary to secure the loan. Actually, this can sometimes happen even if they were pre-approved, as the bank has the right to alter their decision if they receive any information during the process that indicates that the buyer is not qualified to obtain financing.
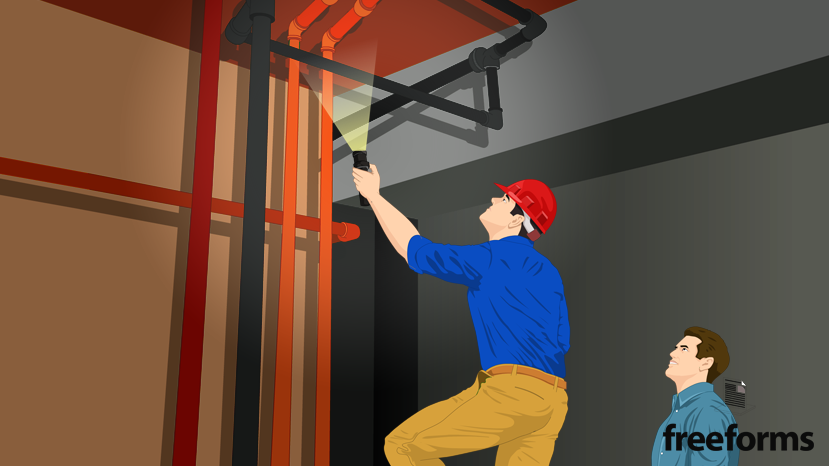
Inspection – If there is a major issue identified during the inspection, the buyer has carte blanche to terminate the contract unless the seller facilitates the issue by either incurring the cost of having a professional repair the issue or subtracting the cost of the repair from the purchase price. This could potentially prolong the amount of time it will take to reach the closing.
Title – Another element that can postpone a closing date is an issue with the property’s title. Most buyers will have a title search conducted while under contract to ensure that it is free and clear of any encumbrances. Complications that can be linked to the title include:
- Clerical Errors
- Encroachments
- Hidden Easements
- Invalid Deeds
- Liens
- Unpaid Property Taxes
Step 7 – Getting the Home Ready for Transfer
![]()
As you approach the closing date, it is important that you start to coordinate your move out of the property. You can start by:
Moving Your Belongings Out of the Home – Sellers should have all items that are not included in the sale removed from the property at least twenty-four (24) hours before the buyer’s scheduled move-in date. Prepare in advance by:
- Packing smaller items into boxes weeks prior to your move, as the little things can be the most time-consuming.
- If you are going to hire a moving company, preemptively schedule a date to ensure that you will have the company booked before you are supposed to vacate the premises.
- If your other property is already available, start bringing items over to the new home on the days leading up to the move-out date.
Cleaning the Property – After the home is emptied, it is considered common courtesy to give it one final cleaning. In fact, it is not uncommon for a seller to pay a professional cleaning company to come in and service the property prior to closing. Just make sure to:
- Vacuum and wash the floors.
- Wipe down countertops and sinks.
- Empty/Clean the refrigerator.
- Scrub toilets and bathtubs.
- Take out any remaining trash.
Canceling Services Registered Under Your Name – On the days following up to your move-out date, contact any companies that currently provide services to the home and have them canceled or transferred to your new residence. Some services that you may want to adjust include:
- Utilities (gas, electric, water & sewage)
- Cable/Internet & Telephone
- Postal (change mailing address)
- Trash Collection
- Security System
- Newspaper Subscription
- Homeowners Insurance Policy (only cancel after the title search has been performed)
Secure the Property – Once you feel that the property is fully prepared to be transferred over to the new owner and you are ready to leave, it is vital that you properly close down the home. Ensure that the following tasks occur:
- Turn off any unnecessary lights/electricity.
- Unplug any potential hazards.
- Shut off any water valves that could potentially cause flooding.
- Set the thermostat to an appropriate climate.
- Close and fasten all the home’s windows.
- Lock all the doors that give access to the property.
Final Walk-Through – Grant the buyer access to the property within twenty-four (24) hours of the closing. This allows them to examine the property one last time before finalizing the transaction, giving them the chance to verify that the property is as it should be.
Step 8 – Closing on the Property
Finally, the day has arrived where you will be officially closing on your property. This will usually take place at the title/escrow company’s office where you will be executing all the final paperwork that is necessary to formally conclude the sale. It is important that you bring the following materials:
- Pen
- Photo ID
- All the property’s keys and passcodes.
- Additional Funds (if necessary)
- The deed to the home (if the mortgage has been paid off).
- Invoices of any repairs made per the buyer’s request.
- Any other documents regarding the property or its appliances.
Signing the Closing Documents – Since you are selling your own home and do not have a listing agent assisting you with the presented documentation, it is important that you take your time and thoroughly read each form. If there are any sections that you are unsure of, ask the closing/escrow agent present (or attorney, if applicable) to clarify the information provided. Once you have a full understanding of all the paperwork distributed, you may sign the following documents within the designated areas to complete the process:
- Bill of Sale
- Certificate of Title
- Closing Statement
- Deed
- Mortgage Note (or Loan Payoff)
- Tax Disclosure
Receiving the Net Proceeds of the Sale – Congratulations! You may now collect your money from the title/escrow company. But keep in mind, all the money you receive from the sale will not directly go into your pocket. You must deduct:
- Balance of your current mortgage.
- Any property taxes or other unpaid bills.
- Title Fees
- Escrow/Attorney Fees
- Commission of the buyer’s agent.
This will all be arranged by the title/escrow company at the time of closing, who will then give you a full breakdown of all the charges imposed. Whatever is left over is yours, whether it goes towards a new home or into your bank account.
How to Write a Real Estate Purchase Agreement
Step 1 – Download the document in Adobe PDF or Microsoft Word (.docx).
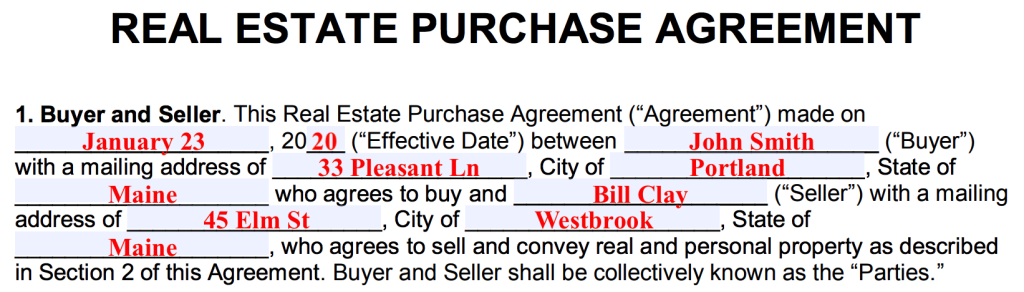
Step 2 – Identifying the Buyer & Seller – Fulfill the first section of the form regarding the participating parties by entering the following information:
- Date in which the agreement is being put into effect (month, day, & last 2 digits of the year)
- Buyer’s Full name
- Buyer’s Mailing Address (street, city, & state)
- Seller’s Full Name
- Seller’s Mailing Address (street, city, & state)
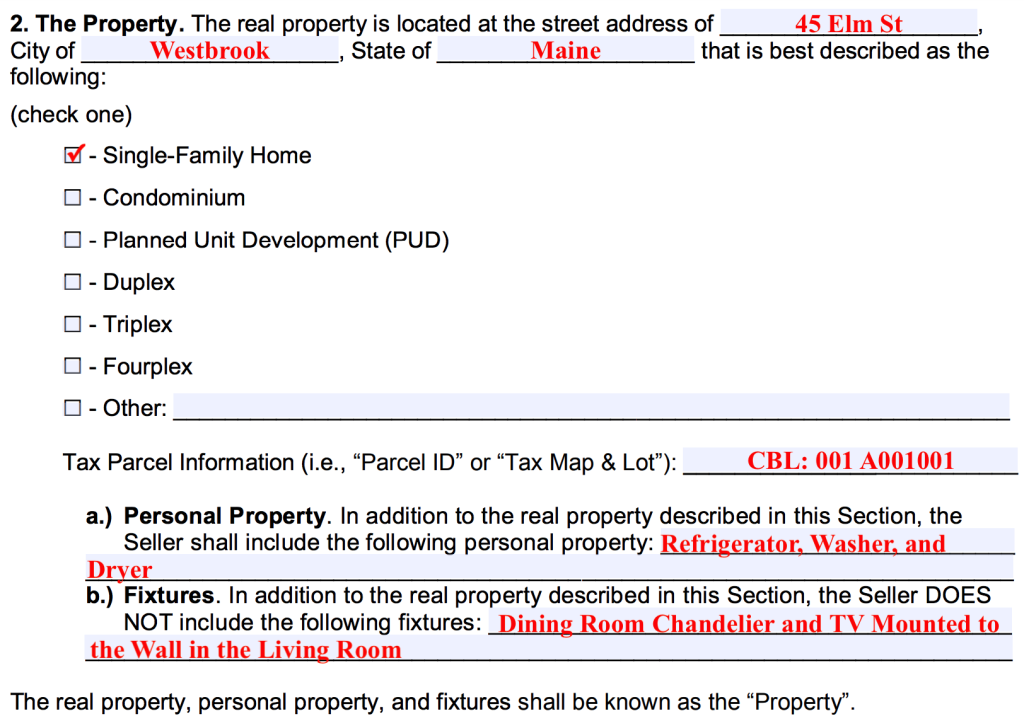
Step 3 – Identifying the Property for Sale – Next, you are going to want to describe the property that is being sold/purchased by inputting:
- Address of the Property (which may be the same as the seller’s mailing address)
- Type of Home (choose one):
- Single-Family Home
- Condominium
- Planned Unit Development (PUD)
- Duplex
- Triplex
- Fourplex
- Other (If none of the abovementioned options apply, you may check this box and insert your own description of the property.)
- Tax Parcel Information – Enter the number associated with the property’s “Parcel ID” or “Tax Map & Lot” (this may differ from state to state).
- Personal Property – Be sure to write in any of the seller’s personal property that has been agreed to be included with the sale of the home (be as specific as possible).
- Fixtures – A fixture is something that is physically attached to the structure and is considered real property. If the seller would like to remove a fixture and keep it for their next home, they must stipulate it within this section.
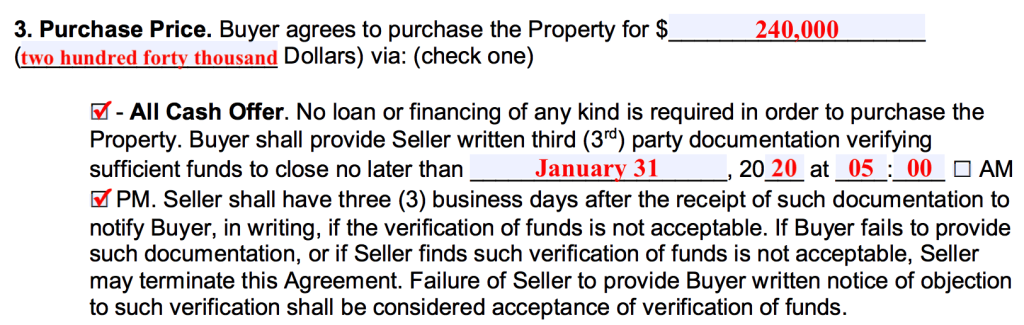
Step 4 – Stipulating the Purchase Price & Method of Funding – In the top portion of this section, enter the proposed purchase price into the corresponding spaces (in numerical and written form). Once the purchase price has been established, select how the buyer will supply the funding for the acquisition. They have the following options:
- All Cash Offer – The first option is for buyers who will be purchasing the home in cash instead of using any type of financing from a mortgage company. If this applies to the transaction, simply:
- Check the box indicating that it is an “All Cash Offer”.
- Enter a date & time in which the buyer has to supply the seller with documentation from a third (3rd) party that confirms that they, in fact, do have the necessary funds to pay the full purchase price of the property.
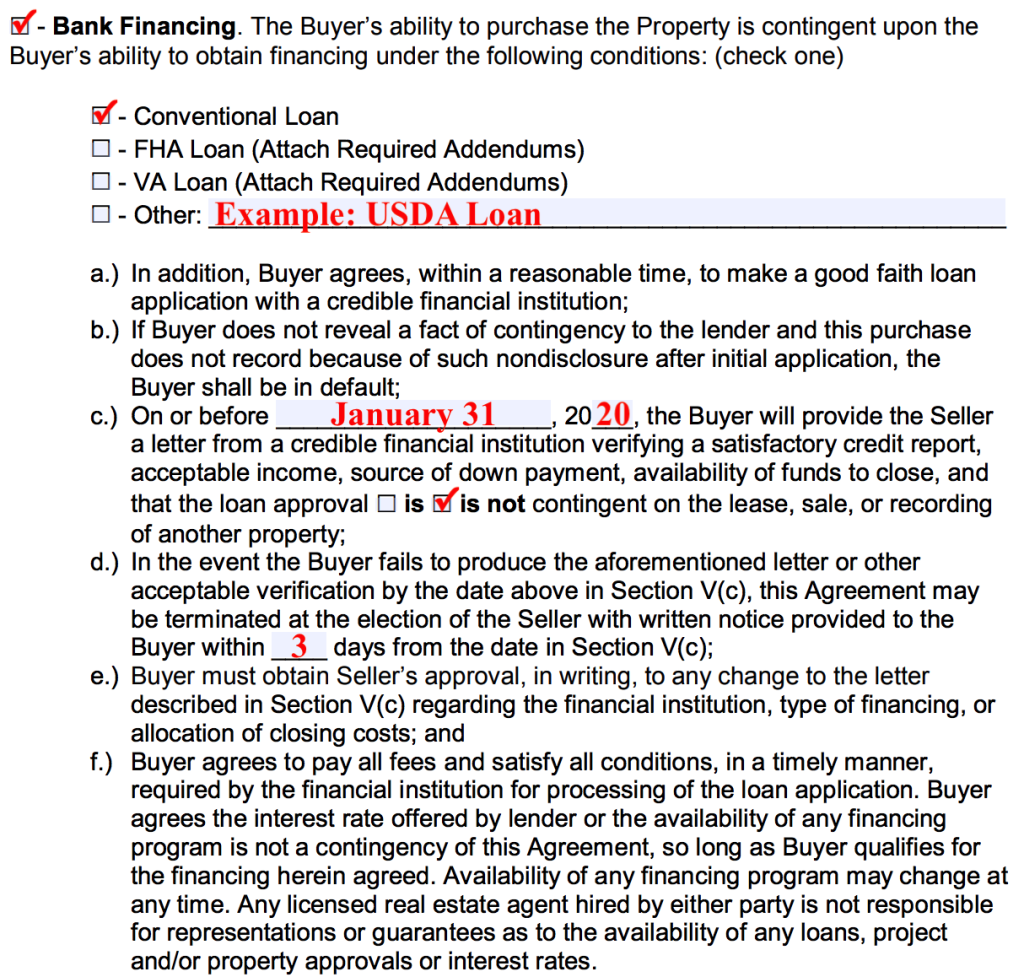
- Bank Financing – The majority of homebuyers will obtain the funds needed to purchase the property through a financial institution. If the buyer requires financing in order to purchase the home, then they should indicate this by:
- Marking the box next to “Bank Financing”.
- Selecting which type of loan the buyer will be securing:
- Conventional
- FHA Loan
- VA Loan
- Other – If the type of loan being used is not listed, select this option and input your own description (for example, a USDA loan).
- Provide a date in which the purchaser has to furnish the seller with a letter of pre-approval from the lender.
- Check one of the following boxes concerning buyer’s loan approval:
- The loan approval is contingent on the lease, sale, or recording of another property.
- The loan approval is not contingent on the lease, sale, or recording of another property.
- Enter the number of days the seller has to provide written notice to the buyer stating that they are terminating the contract due to the buyer’s failure to supply the needed loan approval documents by the date recorded in Section C.
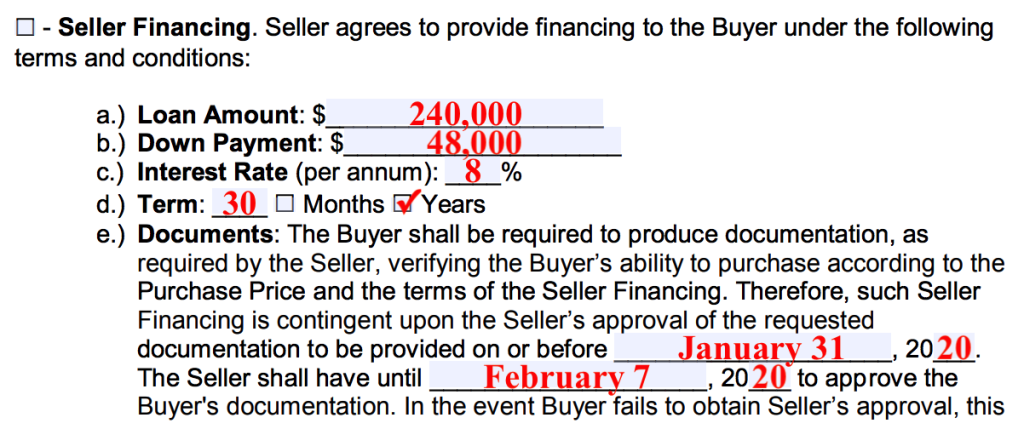
- Seller Financing – If the owner offers to provide a loan to the purchasing party as an alternative to them acquiring financing from a mortgage company, then the following should occur:
- Check the box that indicates “Seller Financing”.
- Enter the amount of the loan in dollars.
- Record the value of the down payment.
- Insert the percentage for the interest rate.
- Enter the term of the loan (in months or years).
- Specify the date in which the buyer must deliver any requested documents to the seller by (month, day, & last 2 digits of the year).
- Select a date in which the seller has to approve the purchaser by (month, day, & last 2 digits of the year).
Step 5 – Earnest Money/Sale of Another Property Contingency/Closing Costs – Determine the following aspects of the sale:
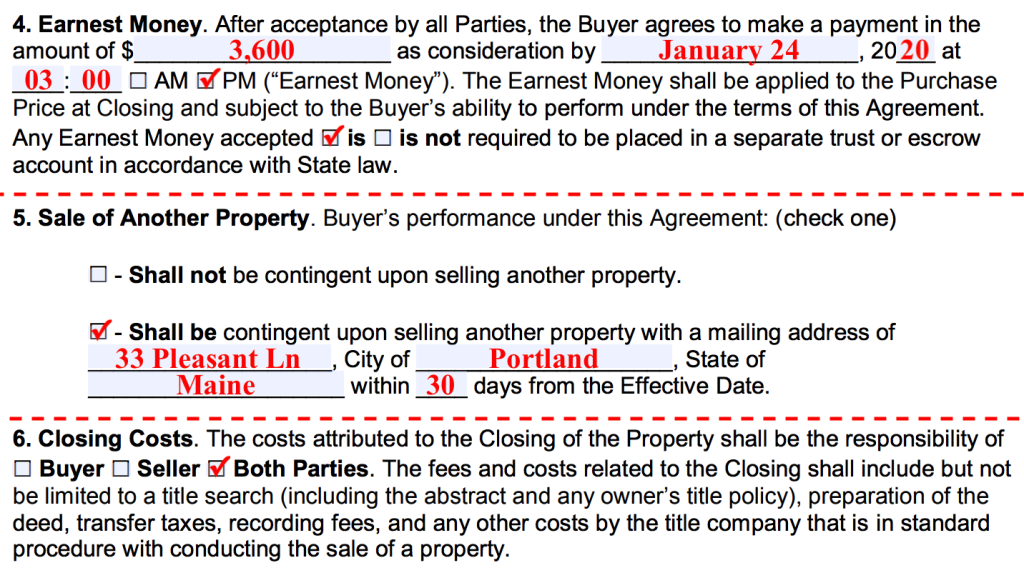
- Earnest Money Deposit – If the buyer is going to provide an earnest money deposit, whether it is a strategic move or the seller requires it, the individual filling out the form should:
- Insert the amount of the deposit in dollars.
- Supply a date & time in which the buyer has to make the deposit.
- Check whether or not the earnest money is required to be held in a separate trust or escrow account.
- Sale of Another Property – Does the buyer request the transaction to be contingent upon them being able to sell their property? If not, simply check the first (1st) box. If so, check the second (2nd) box and provide the following details:
- Buyer’s Mailing Address (street, city, state)
- Number of days the buyer has to sell their home from the effective date of the purchase agreement.
- Closing Costs – Every real estate transaction comes with the cost of closing. The party responsible for covering the expenses can vary depending on how the arrangement was negotiated. In this section, you must make one (1) of the following selections regarding which party is obligated to pay the cost:
- Buyer
- Seller
- Both Parties
Step 6 – Closing & Survey Details – The following sections require the individual filling out the form to define the following terms:
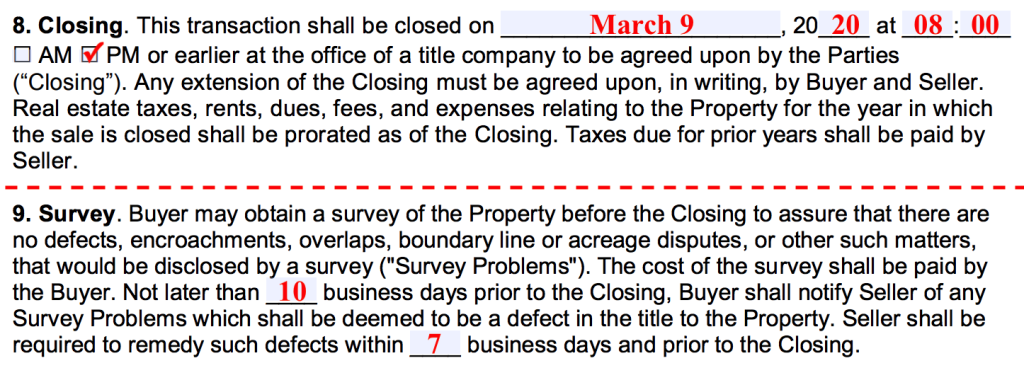
- Closing – Establish a date & time in which the closing must take place by.
- Survey – All buyers are entitled to have a survey performed on the property to ensure that there are no existing problems within the boundaries of the land. Provide the essential information below:
- Enter the number of business days from closing that the buyer has to notify the seller that there was an issue discovered during the course of the property’s survey.
- Enter the number of business days the seller has to remediate the issue from the time of being notified (must also be prior to closing).
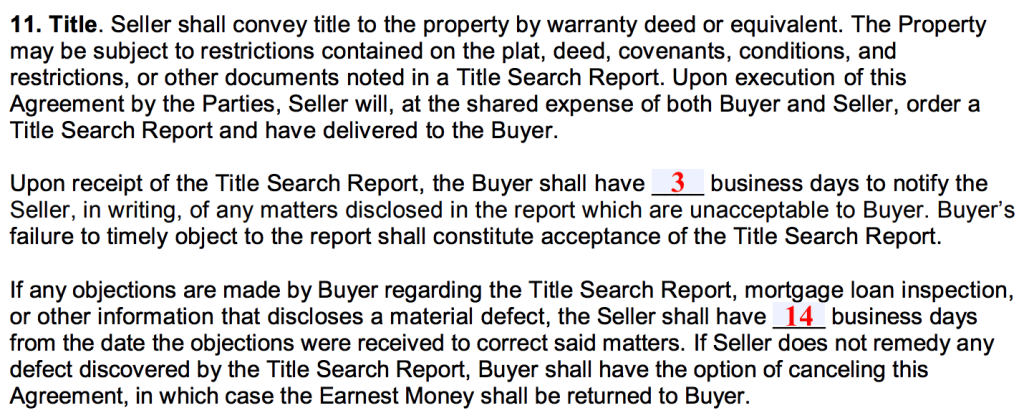
Step 7 – Title – In regard to the “Title Search Report”, the party supplying the information to the form should:
- Include the number of business days the buyer has to inform the seller that there is an issue with the title after receiving the report.
- Register the number of business days the seller has to rectify the problem.
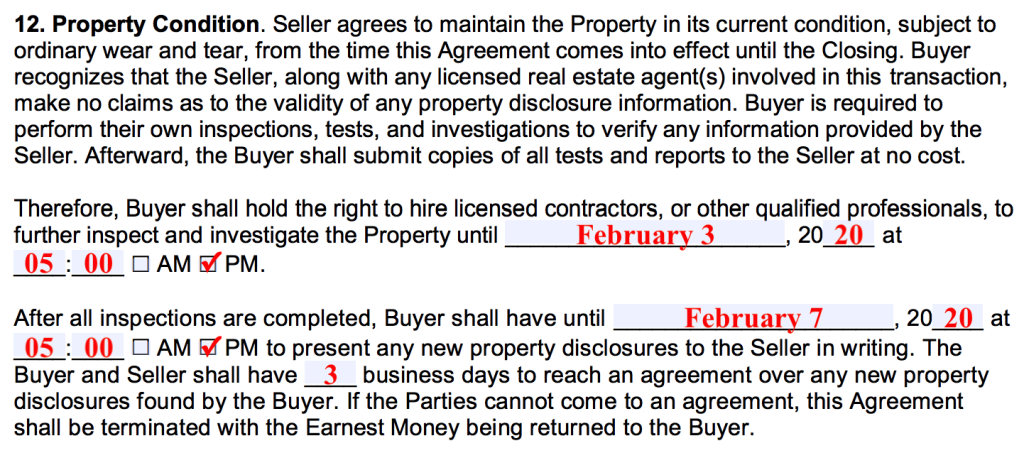
Step 8 – Property Condition – This portion of the agreement essentially states that the seller agrees to maintain the current condition of the home until the time of the sale and that the buyer has the right to hire a licensed inspector to further investigate the property. The following conditions should be recorded concerning the inspection:
- Provide the date & time that the buyer has to have the property inspected by.
- Issue a date & time that the buyer has to present the seller with any newly discovered property defects. This must be delivered, in writing, by the time listed.
- Input the number of business days that both parties have to come to an accord on how to remedy any recently uncovered defects contained within the home.
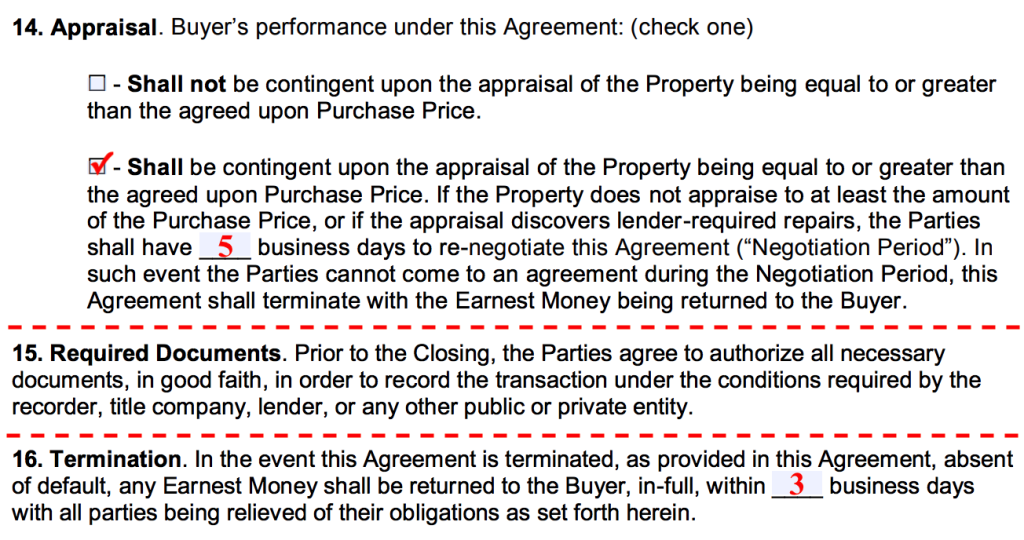
Step 9 – Appraisal & Termination – Outline the requirements associated with the following components of the sale:
- Appraisal – Most lenders will require that an appraisal be performed on the property in order to finance the purchase. Select one of the following options:
- If, for whatever reason, you feel an appraisal is not necessary to continue with the exchange, check the box stating that the agreement shall not be contingent upon an appraisal being equal to or greater than the prearranged sales price.
- As for the majority of individuals taking part in the sale of real estate, mark the second (2nd) option stating that the transaction shall be contingent upon an appraisal being equal to or greater than the asking price that was settled upon. After indicating your selection, insert a number of business days that the parties will have to re-negotiate the terms of the contract if an unsatisfactory appraisal does occur.
- Termination – Enter the number of days that it will take to return the buyer’s earnest money deposit in the event that the agreement is terminated.
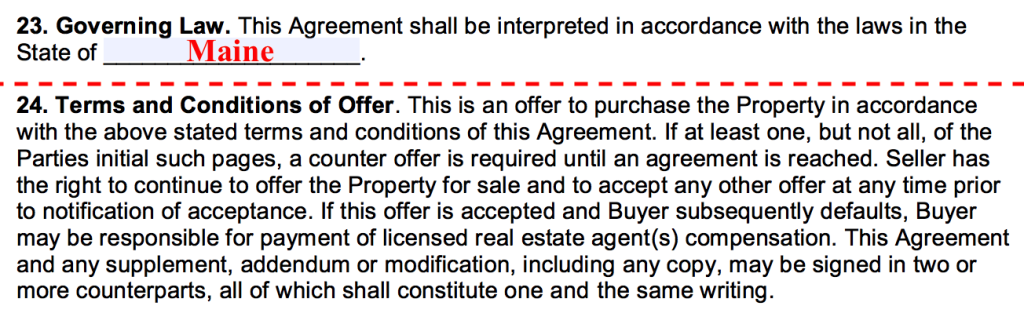
Step 10 – Governing Law – This portion of the form just simply requests that the user provide the name of the state where the sale is taking place and whose laws govern any local real estate transactions.
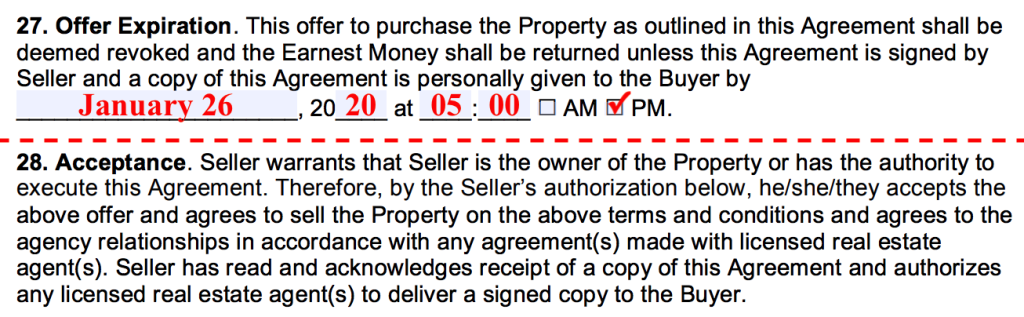
Step 11 – Offer Expiration – Set a date & time from the effective date of the contract in which the receiving party has to accept the agreement and sign it. If the time limit is exceeded, the offer will expire and is no longer valid.
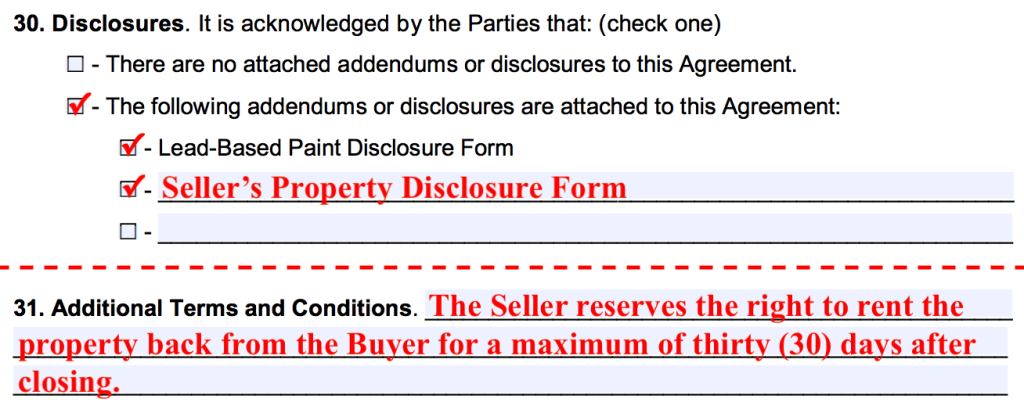
Step 12 – Disclosures and Additional Terms & Conditions – The final two (2) sections regarding the terms of the contract request that you cover the following areas of the agreement:
- Disclosures – In most states, real estate sales require certain disclosures to be made. Confirm what disclosures have and haven’t been included within the content of the agreement by:
- Checking the primary box stating that there are no addendums or disclosures attached to the contract.
- Checking the secondary box confirming that there are indeed addendums and disclosures attached to the contract.
- If the lead-based paint disclosure is attached, check the box certifying this fact.
- Write-in any additional disclosures or addendums and check the corresponding box to confirm its inclusion.
- Additional Terms & Conditions – If there are any additional terms & conditions that are not present within the content of the purchase agreement that you would like to include, then write them into the available space provided (for example, the rent-back clause contained within the screenshot below).
Step 13 – Signatures – The final portion of the agreement requires all participating parties to supply the following:
- Seller’s Signature & Date
- Seller’s Signature & Date (if there is a second owner of the home)
- Buyer’s Signature & Date
- Buyer’s Signature & Date (if there is another purchaser involved in the sale)
- Agent’s Signature & Date (if there is a listing agent involved)
- Agent’s Signature & Date (if there is a buyer’s agent involved)
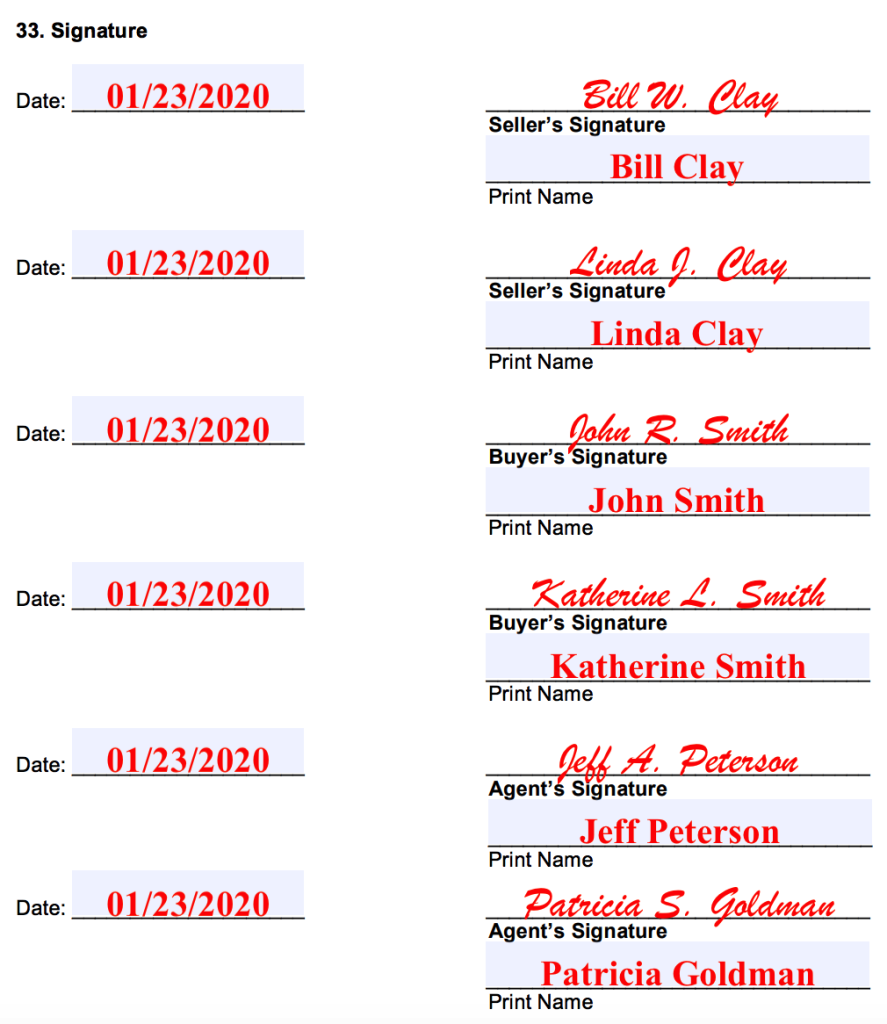
Once all the above fields have been executed, the document will become a binding purchase agreement that is enforceable by law.