

 Adobe PDF
How to Sell an RV
Individuals looking to sell their RV should consider what factors go into successfully marketing a vehicle. Certain measures can be taken to ensure you accomplish a smooth transaction and get the best price for your RV.
Step 1 – Appraise your Vehicle
The first step is to calculate the vehicle’s value. Several websites provide value-assessing tools to help determine how much you should list your vehicle. Some websites that contain this feature are:
Also, browse the various classified ad websites (like RVtrader) looking for similar vehicles to yours to get a feel for what the market offers.
Step 2 – Advertising
Once you have decided on a fair market price, you must inform potential buyers that you have an RV for sale. This can be approached in a couple of different ways. Your first option would be posting an ad in a regional magazine and/or newspaper. Locals who buy the paper will see the ad and possibly contact you if interested. The next option is displaying the RV with a “for sale” sign in an area with a high traffic count, exposing motorists to the opportunity to purchase the RV (be sure it is parked in a protected area). The most effective way these days is to create a post on a popular classified ads website. Some websites that cater specifically to RVs and motorhomes would be:
You can also post on some of the more general websites that do not specialize in the sale of RVs or motorhomes, such as:
- CraigsList.org – Under the “for sale” section, you have the option to post an ad to “rvs+camp”.
- Facebook.com – Post an ad within the “Facebook Marketplace” announcing that your vehicle is for sale.
Step 3 – What to Include in your Ad
When creating an ad for your vehicle, you must include specific elements to increase your chances of achieving a sale. One of the most important aspects of your post will be the pictures of the vehicle’s interior and exterior. Be sure to clean the RV inside and out before taking the photos. Once it looks pristine, take photos of the RV from different angles under decent lighting. Don’t be afraid of taking a lot of snapshots, as you can go back and select the ones you think are best. After selecting your photos, it’s time to write a description. Some things you may want to include are:
- Title (this will be the headline of your post; be sure to include the essential details concerning the RV to attract visitors)
- Price
- Location
- Make
- Model
- Year
- Type
- Color
- VIN (Vehicle Identification Number)
- Mileage
- Dimensions (length, width, height)
- Fuel
- Cylinders
- Drive
- Transmission
- Overall Condition
- Title Status
- Features/Amenities
- Seller Contact Info
Step 4 – Scheduling a Showing
As long as you have the vehicle priced right, you should receive some responses to your ad within 1-2 weeks. Try to reply promptly to any inquiries sent by prospective buyers. Eventually, someone will ask to see the vehicle in person. Arrange to meet at a specific time and location where both parties feel comfortable. Prep the RV for showing and be prepared to address any concerns the possible buyer may have. You should disclose all defects associated with the vehicle to avoid any future disputes. In anticipation of a sale, make sure that you have the following paperwork readily accessible:
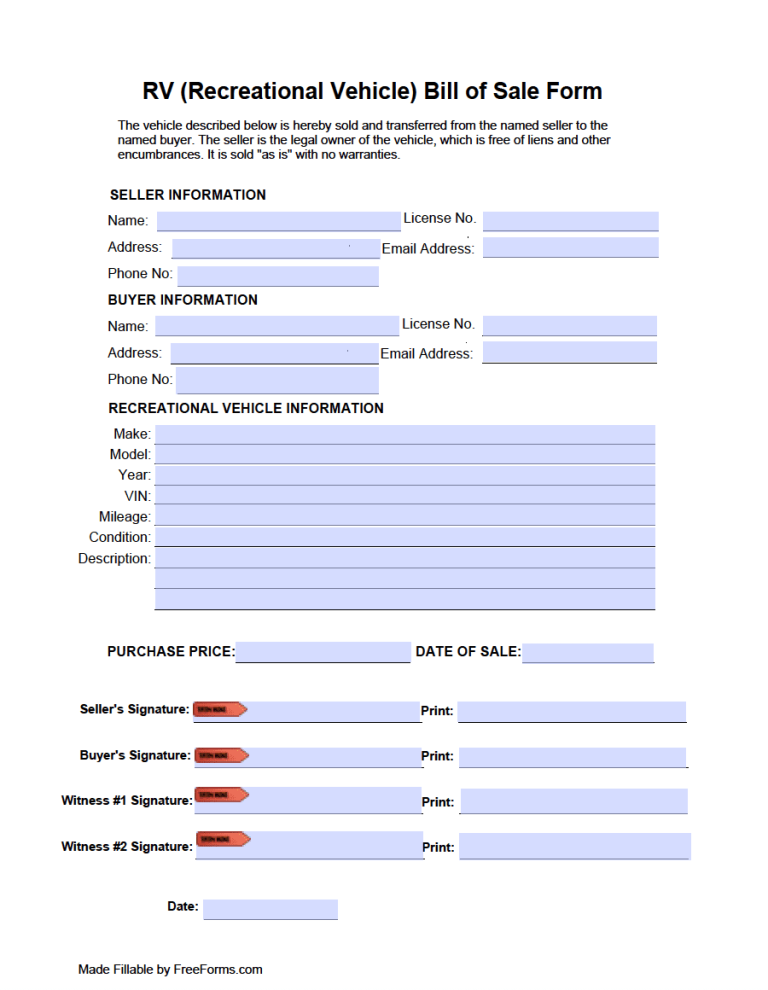
- Bill of Sale (2 copies of the form)
- Vehicle’s Title
- Maintenance Records
- Warranty Certificate (if applicable)
Step 5 – Establishing the Terms of the Sale
If the buyer is pleased with the showing, it will be time to discuss the terms & conditions of the contract. The interested party may ask for a reduced price, and it is up to the seller to either accept, counteroffer or deny the proposal. After an agreement on the price, the next thing that will need to be arranged is the method of payment used for the transaction. The best method of payment for the seller to avoid any fraud would be cash. If the buyer insists on a check, it may be wise to meet at their bank to ensure it clears. Once the money has been transferred, the seller may provide the buyer with the vehicle’s keys and signed documentation. (Both sides of the transaction should walk away with a completed copy of the bill of sale to hold as a receipt for the exchange.)